Whether you call it a pull stud, a retention knob or “that threaded thingamajig attached to the end of the toolholder,” it deserves the same care and attention you give to all of your facility’s tooling. Here are some best practices for looking after your retention knobs.
A retention knob is a critically important factor in the machining process, but this humble component doesn’t always receive the attention it deserves.
If your company uses only HSK, PSC (Capto) or KM4X toolholders, feel free to skip to the next article. If you’re using CAT and BT-flange “steep” toolholders (and almost everyone does), ask yourself the following questions:
Do you use a torque wrench when installing retention knobs?
Do you clean and inspect your retention knobs regularly?
Do you replace retention knobs every few years (sooner for businesses that run more than one shift)?
If the answer to any of these is no, keep reading. Failure to perform these important maintenance tasks can lead to a spectacular crash, one that involves flying toolholders and extreme damage to the machining center spindle. That’s because, like all metals, the alloy steels used to make retention knobs are prone to fatigue, and fatigue leads to breakage. Now imagine if that breakage occurs at 12,000 rpm. Scary.
Stop Cranking
Retention knobs are the vital connection point between your toolholders and machine tools. Unfortunately, these inexpensive items—most cost less than dinner at a restaurant—are often overlooked and sometimes abused.
“We see shops making plenty of mistakes with their retention knobs, starting with the installation,” says Greg Webb, executive vice president for business development and OEM sales at Techniks Tool Group.
“We see shops making plenty of mistakes with their retention knobs, starting with the installation.”
Greg Webb,Techniks Tool Group
Webb emphasizes that using a torque wrench set to the manufacturer’s specifications is a crucial first step in extending the life of the retention knob and the toolholder. By contrast, assembly via a breaker bar or mallet leads to the metal fatigue mentioned earlier. Worse, excess torque tends to swell the metal around the retention knob, damaging the toolholder and creating a less-than-perfect fit between it and the spindle taper. This bulging leads to vibration and fretting, excess load on the tool change mechanism and eventually damage to the spindle itself.
“And make sure you use the right style of retention knob for your machine tool,” adds Brendt Holden, president of Haimer USA. “Walk into a lot of shops, and you’ll see pull studs stored in a big drawer where they’re free to bang up against one another. Not only does this lead to nicks and scratches, but most companies have multiple brands of equipment, so it’s quite easy to grab the wrong pull stud. That can lead to all sorts of issues.”
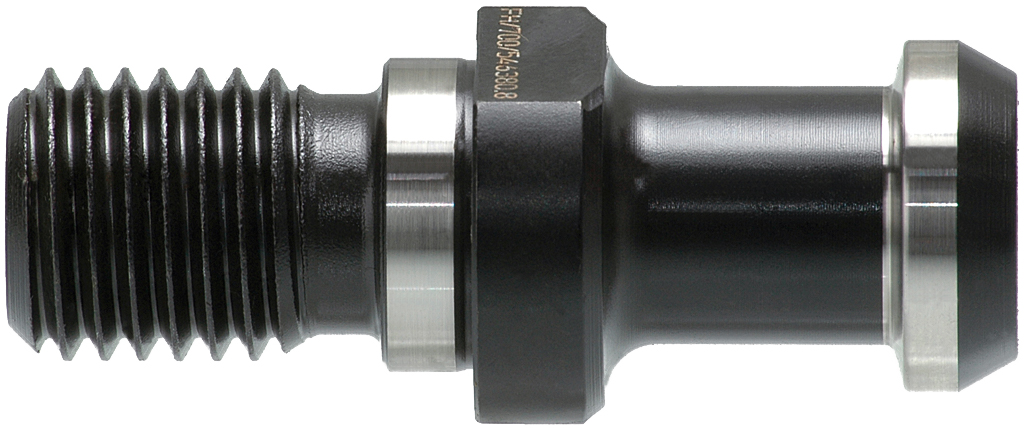
Retention knobs like the one shown here are made of high-quality steel alloy and boast machined surfaces in all functional areas. (Image courtesy of Haimer)
Choosing the Best Retention Knob
Holden and Webb might disagree over who makes the best retention knob, but they definitely see eye to eye on what features to look for when choosing one. Aside from the use of high-quality steel, black oxide coatings and careful heat treatment, both suggested that all functional surfaces be finish-ground after hardening.
Chief among these surfaces is the cylindrical pilot that mates with the bore on the toolholder. Somewhat surprisingly, this is called for only under the BT-flange toolholding standard (not CAT), yet both manufacturers (and a few others) grind the pilots of all retention knobs and toolholders, knowing that it improves balance and repeatability.
Says Holden: “This is one of the reasons we preach to our customers that the entire toolholding assembly, including the pull stud, be balanced as a single unit.”
The two toolholding experts also agreed that retention knobs, like toolholders, have a finite life. Webb points out that Haas Automation recommends replacing them every 6,000 to 8,000 hours. The machine tool builder also suggests that customers apply a light coat of grease to the retention knob monthly, increasing to weekly for those using through-spindle coolant. Doing so reduces wear of the tool change mechanism and pull stud alike.
Your business might do well with a more conservative plan—such as inspecting retention knobs regularly and replacing them at least every three years if you operate eight-hour shifts or replacing them annually if your production floor runs around-the-clock.
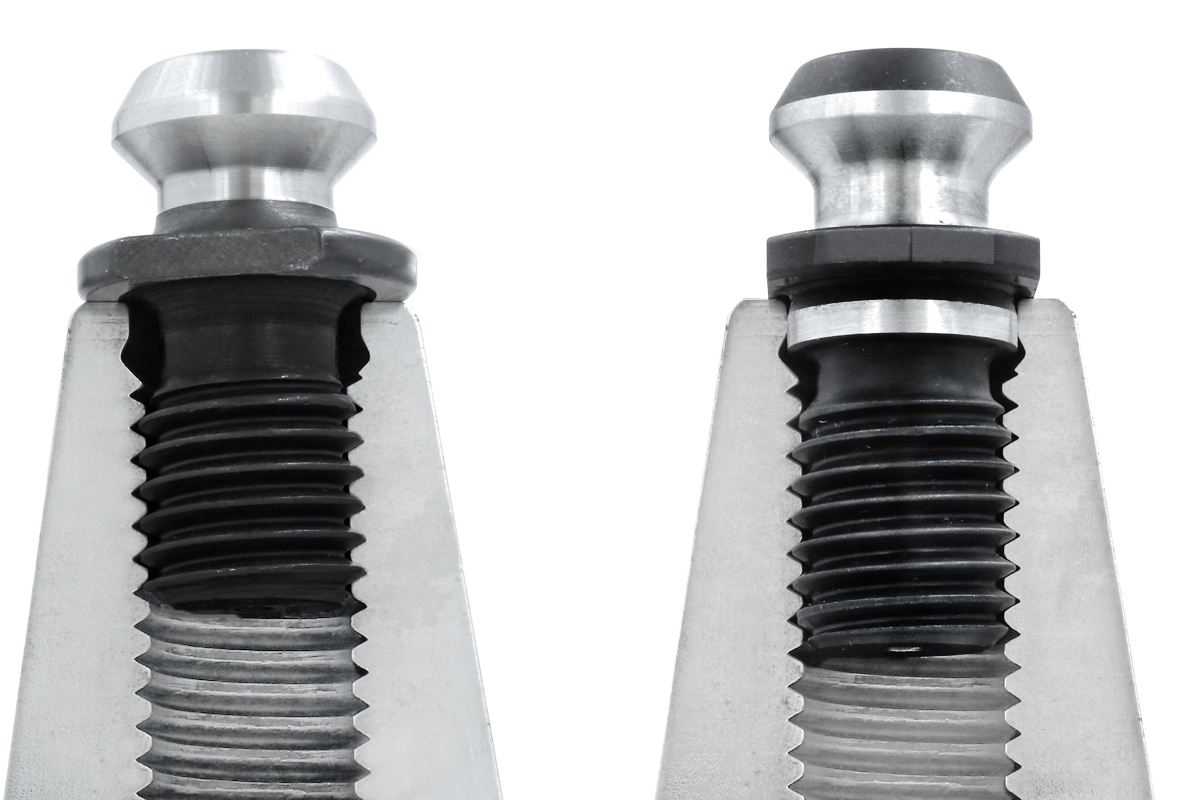
At right is a retention knob with a machined pilot and locating face. Note the greater surface contact compared with the one on the left. (Image courtesy of Techniks Tool Group)
Managing Retention Knob Life
The challenge, then, is keeping track of retention knob usage. Machine facilities with a tool life management system and a radio frequency identification system could simply marry a retention knob to a toolholder, serialize the assembly and let the software and machine tools do the rest. When the clock runs down to zero hours, it’s time to replace the pull stud, and quite possibly the entire toolholding assembly.
For everyone else, Webb says it comes down to managing retention knob life with a spreadsheet or pen and paper.
“Many shops are manually tracking cutting tool life down to the minutes and seconds, so keeping track of the toolholder assembly’s usage isn’t as far-fetched as it might seem,” he says. “But in all fairness, even high-quality retention knobs are small potatoes from a shop floor expense perspective. This is one instance where it makes good sense to replace them sooner rather than later.”
One final piece of advice is to mark the knob with a date code and preferably a serial number. Some suppliers do this as standard, but if not, it’s easy enough to send the pull studs out for laser marking or just mark them yourself.
Regardless of whether and how retention knob life is managed, it’s critical that workplaces inspect them routinely, just as they do their collets, milling holders, indexable cutters and all the rest. Look for dents and dings, cracks and corrosion, and at the first sign of wear, send those tired retention knobs packing.
What tips, tricks and techniques can you share about retention knob maintenance? Post your thoughts in the comments below.
By virtue of how hard they tug on the wrench, machinists can get a pretty good idea of how much force they’re applying to the toolholder on a manual milling machine.
Not so with those loading toolholders into CNC machining centers. Here, it’s often assumed that the drawbar is doing its job, and unless the tool comes loose or the machine sends out an alarm, it’s full steam ahead.
Unfortunately, the Belleville spring packs used in most drawbar mechanisms weaken with age.
Other CNC machine tools use gas pressure to draw holders into the spindle, and as anyone with an air conditioner in their car knows, gas cylinders eventually leak.
The results are not pretty. Worst case, the toolholder will come loose, possibly with catastrophic results. Even before then, however, inadequate clamping force leads to shortened tool life, poor surface finishes, chatter during heavy cuts, toolholder fretting (which looks like rust) and damage to the spindle taper.
The solution, as with so many other machining problems, is routine maintenance, and the best way to avoid this particular failure mode is with a drawbar force gauge. They’re readily available, sell for about $1,000 and will prevent all of the ugliness just described when used every month or two.
Compared with the expense of downtime and scrapped parts, it’s easy money.
Author: Kip Hanson
Kip Hanson is a freelance writer and manufacturing consultant. Hanson, who is the proprietor of KAHMCO LLC, has more than 40 years experience in manufacturing, machine tools, fabrication and ERP systems. In addition, Hanson is a contributing editor at Manufacturing Engineering, Shop Metalworking Technology and others. He has been writing about manufacturing technology since 1998.
To request a quote, please login to your existing account or register a new one. This helps us provide you with a personalized experience and keep track of your requests.

![Common Abrasive Mistakes in Fabrication [Infographic]](https://images.ctfassets.net/5j4ln2up7bt7/63J06JpDcUwZGXadYmQH5O/722be8804d5f3b14e59d1c9cc5205250/Option_1_AbrasiveMistakes_GettyImages-1443275947-thumb.jpg)