Share

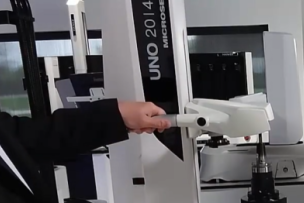
We are all familiar with the basic measurements taken by a height gage, but many of today's new instruments can perform with near coordinate measuring machine (CMM) capabilities.

Whether you’re talking about measurement checks in the quality room or a quick, accurate check on the shop floor, height gages remain one of the most useful tools in metrology today. We all are familiar with the basic measurements taken by a height gage, but many of today’s new instruments can perform with near coordinate measuring machine (CMM) capabilities with similar accuracies to their CMM big brother. There is no replacing the CMM, but having a multipurpose height gage than can perform similar tasks can save a CMM for the more intricate and critical quality checks. 

A height gage does exactly as its name indicates—measures height. A slider with a measuring stylus moves relative to a measuring scale on a beam along a single vertical axis nominally perpendicular to a reference plane on the instrument base. 

Height gages are used on a granite surface plate to measure and/or scribe part features from a datum plane. A scriber, test indicator, touch probe or CMM-style probe is used to locate the measured feature. Height gages are a useful instrument for quality control and their capabilities continue to increase.

There are three basic types of height gages: Vernier, dial and digital. 

For basic height measurement with the slider, all are good tools, but digital is where most advancements are being made. Improvements include higher resolution and accuracy, temperature compensation, and the capability to measure straightness, squareness, flatness and angles.

While there is no replacing a CMM, today’s height gages can perform with CMM-like capabilities and with similar accuracies.

Higher Resolution, Accuracy and 2D Measurement 

New encoders allow for a higher resolution in today’s gages. Robust construction also increases the potential for higher accuracies, however, as the stability of the gage increases, so too does the weight. Normally, this makes it difficult to slide the gage due to increased friction. To compensate, some units have a pneumatic floating option which allows the entire assembly to float on an air cushion with the push of a button. 

Most standard measurement applications use the height, gaps and thickness features. Newer gages can now measure diameters, hole to hole distances, peak measurements from radiused surfaces and most distances between measurement combinations. 

Let’s say you have a print that calls for a 2D measurement. Typically, that would require a CMM, but with a height gage 2D measurement feature, you may be able to handle that type of application with a newer high-end digital height gage. The capability of doing diagonal measurements can be done by rotating the part 90 degrees and simply measuring the same points—something only multi-axis units such as CMMs or optical systems could perform before. 

One application basic height gages have difficulty with is distance between centers. This challenge was overcome when the height gage with calculation power was introduced. This allows the height gage to memorize the highest and lowest point within a sweep. This height gage is still a 2D gage, but peaks and valleys also can be measured or stored and recalled with the push of a button. The ball probe can be interchanged with smaller ones to reach narrow slots. Most height gages with a scriber have been used to measure steps or heights that face upward. Measuring the bottom edge of a slot or groove was not really an option until a ball probe combined with a microprocessor to compensate for the ball diameter was introduced, making the process of measuring distances such as center-to-center quicker and easier.

Other Measurements

Flatness, tolerancing and angles: A horizontal flatness can easily be measured by hitting a flatness button, coming down into contact with a top or bottom surface and then scanning/sliding the part or height gage horizontally. 

Easy to read go/no-go tolerancing displays make it less likely for operators to overlook issues. They can be set up as either a direct read value or comparison-type which would be the deviation from zero from a master. 

Many quality checks call for angle measurement. With special probes or a horizontal offset, this type of measurement is possible on most new height gages. The part is measured on the height as usual, but then moved horizontally away and the height measured again. The difference in heights is coupled with the offset distance entered to calculate the angle. 

Straightness/squareness: Some height gage models have the capability of inputting the output from linear displacement devices such as indicators. Due to this input, displays are capable of showing straightness as well as squareness due to the high-tolerance squareness specification of the gage. 

Output and Data 

As Industry 4.0 looms, there are more requirements for data output in general and output in different formats. Some data is input directly into spreadsheets or into statistical process control (SPC) software through USB and RS-232C. The data itself has also become more complete and can include features such as measurements, statistics and time stamps. Statistics can also be auto-calculated and shown on-screen or output to a PC.

Newer gages offer ways to create simple programs which walk an operator through pre-measured points to ensure that the same positions are being measured every time, without overlooking a measurement. This is helpful for inexperienced operators. Because many of these gages are being used on the shop floor, temperature compensation coefficients are automatically input if a material type is selected, helping to improve accuracy in harsher conditions. 

Previously Featured in Quality Magazine.

Talk to Us!

Leave a reply

Your email address will not be published. Required fields are marked *

Headquartered in Aurora, IL, Mitutoyo America Corporation is the world's largest provider of measurement and inspection solutions offering the most complete selection of machines, sensors, systems and services with a line encompassing CMM (coordinate measuring machines), vision, form and finish measuring machines, as well as precision tools and instruments, and metrology data management software. Mitutoyo's nationwide network of Metrology Centers and support operations provides application, calibration, service, repair and educational programs to ensure that our 8,500+ metrology products will deliver measurement solutions for our customers throughout their lifetime.

Browse Products from Mitutoyo

More on Technology

President of Haimer USA Brendt Holden demonstrates how setting up your complete tool assemblies the same way every time can increase productivity and, in turn, save you time and money.

What manufacturers can do to deal with inflation.

Learn how to get your pre-machining setup time down to 15 minutes.

MSC

Signing into Better MRO is easy. Use your MSCdirect.com username / password, or register to create an account. We’ll bring you back here as soon as you’re done.

Redirecting you in 5 seconds