VIDEO: Proper Mounting of Abrasive Products on Type 27 Grinders & Type 1 Cut-Off Wheel Tools
In this training video, 3M Abrasives discusses Type 27 and Type 1 abrasives and their respective tools.
In this training video, 3M Abrasives discusses Type 27 and Type 1 abrasives and their respective tools.
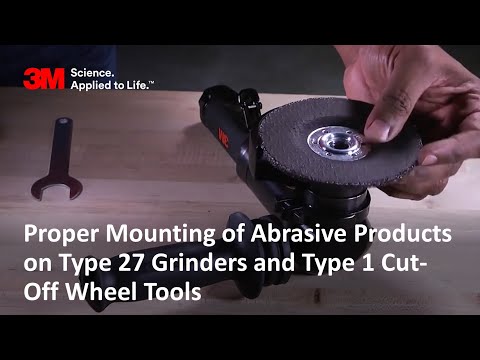
In this training video, 3M Abrasives demonstrates Type 27 and Type 1 abrasives and their respective tools. You will learn how to properly mount hub and flange mounted abrasives and how to properly position the wheel on the tool and within the guard, and how to make adjustments to allow for accessibility to your workpiece. Finally, this video addresses safety issues to adhere to prior to running the tool.
Previously Featured on 3M's YouTube channel.
We're going to demonstrate how to properly mount Type 27 and Type 1 abrasives on their respective tools. This is a Type 27 grinder with a maximum operating speed of 12,000 RPM. This is a Type 1 grinder with a maximum operating speed of 12,000 RPM. The tool maximum operating speed must be less than or equal to the maximum RPM indicated on the wheel. A Type 27 grinder guard has an open face while the Type 1 grinder guard has a closed face. You should be sure to always read and follow the instructions, manuals and safety inserts for the power tool, the abrasive product, and any accessories before using them. We're going to identify how to properly mount hub and flange mounted abrasives onto Type 27 and Type 1 tools. Hub mounted Type 27 wheels have a built-in threaded hub that allows direct mounting on the tool spindle without the use of flanges. The wheel simply threads out of the spindle. Flange mounted wheels require proper orientation of the flanges to ensure the wheel is centered and clamped safely. The first flange must have its lip facing upward. This allows the center hole of the wheel to be centered properly. The second flange must be installed so that the recess is facing the wheel. This allows the lip of the first flange to nest within the recess of the second flange, allowing the wheel to be mounted properly on the tool. We are going to identify proper wheel position on the tool and within the guard. Proper position of the wheel inside the guard allows the guard to provide the highest level of protection for the user. When the wheel is mounted on the tool, certain gaps in spacing are necessary to ensure the guard will function as designed. The depth of the wheel inside the guard must be at least two millimeters as shown in the diagram. This allows the edge and lip of the guard to contain and direct any fragments from a wheel burst away from the user. The gap between the edge of a new wheel and the inner surface of the guard must be between three millimeters and eight millimeters. This provides proper clearance and containment of a rotating wheel while also preventing a larger wheel with a potentially lower maximum speed rating from being mounted accidentally on the tool. If the face of the wheel is flush with the lip of the guard, or if the wheel extends beyond the lip of the guard, the tool should not be used. We're going to identify how to properly mount hub and flange mounted wheels onto Type 27 and Type 1 tools. Several options exist to achieve the proper position of the wheel inside the guard. Use a jumbo guard to provide protection for abrasives that are flush or protrude beyond the current guard on the tool. Simply replace the current guard with a jumbo guard. This should bring most tall abrasives within the guard. As long as the 2 millimeter minimum depth is maintained the wheel is properly positioned. However, accessibility to the workpiece may be hindered if the wheel is too deep inside the guard. If the abrasive is too deep inside the guard, a flange may be used under the wheel to bring the abrasive to a more shallow position within the guard. Be sure to confirm that the abrasive flanges and guard are properly positioned and secure. Confirm air pressure is 90 PSI max. at the regulator. Please ensure that you are wearing proper personal protective equipment including safety glasses, face shield, apron, hearing protection and gloves. Check the tool for vibration and in-use air pressure. To do this, connect the air line and hold the tool below the waist with the abrasive facing downward. Run the tool in a free spin condition and note any unusual vibration or noise. Also note the air pressure at the regulator. It should be slightly less than the initial 90 PSI while the tool is running. Note the drop in pressure and adjust the pressure at the regulator to read no more than 90 PSI while the tool is running. If there is excess vibration, check the abrasive for damage. Also check the tool and mounting hardware for proper installation and damage and correct any issues. If vibration persists, do not run the tool. Contact your local safety coordinator.
When it comes to fabricating, assembling or processing anything around the world, 3M knows efficiency is key. From ultra-strong abrasives that keep processes running smoothly, to futuristic materials that literally lighten your workload. 3M innovative solutions keep your business and your employees working smoothly with innovative industry leading solutions in abrasives, PPE and facilities safety solutions and adhesives and tapes.


To request a quote, please login to your existing account or register a new one. This helps us provide you with a personalized experience and keep track of your requests.