Video Transcript
JACOB SANCHEZ: Chips. Every machinist makes them, but how do you manage them? This right here. This can cause you some problems. What are those problems? Well, it can damage a tool, break a tool. It can ruin finishes on your part. And it can seriously harm you or your workers if this isn't taken care of. So what can you do?
Well, that's why I'm here. And if this looks familiar, it's because I'm here at MTech. This is Mitsubishi Materials USA Machining Technology and Education Center in Mooresville, North Carolina, where we're going to be going over critical components that are going to help us figure out how to safely manage your chips.
Brian, how's it going, brother?
BRIAN JEWELL: Good man. How are you?
JACOB SANCHEZ: Good, you brought out the textbook for me today. What are we going over?
BRIAN JEWELL: Yeah, we're going over chip breakers. How do they work? What's the purpose behind them? You know, there's a lot of research and development that goes into every one of these. They're all made for a certain reason and so, how do we apply them? So today we're going to be doing a demo on 4140.
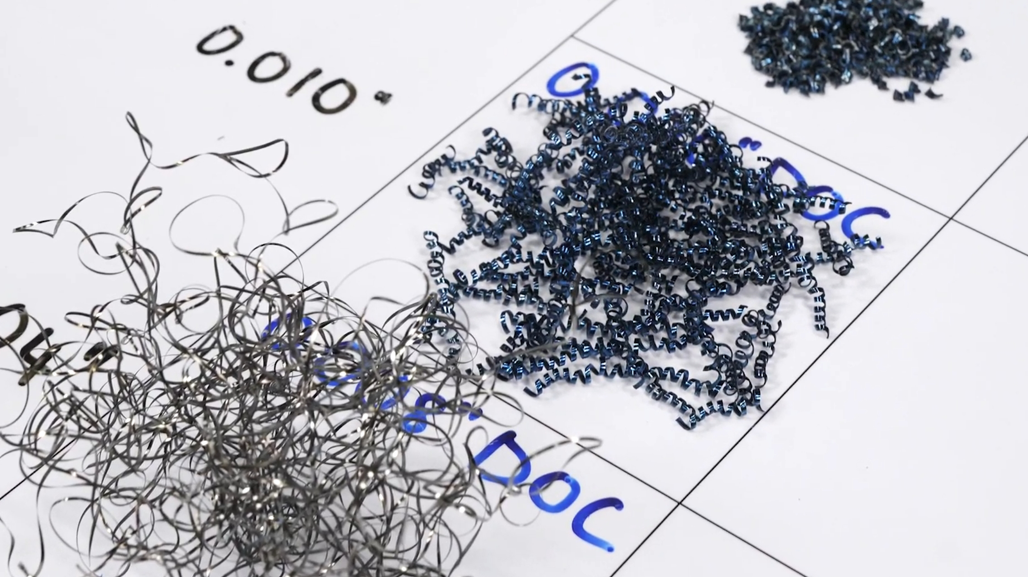
So we're going to look at our light breaker for steel, LP, our medium breaker for steel, and our roughing breaker for steel. And we'll show them where we can apply them, how depth of cut affects those breakers. Looking at these chips, they tell the story right. The light breaker is closer to the corner of the insert, so that chip is curled quite a bit tighter, and you can see it starts to open up with a medium.
And then as we move into that roughing breaker, that's your most open chip. So those are all being applied at the same depth of cut at 70 thou depth of cut. You can use those inserts and have success breaking a chip in the same depth of cut. So you know when do I pick them? Where is the advantage to having a light breaker versus a roughing breaker?
The disadvantage to using a light breaker, like you would a roughing breaker, is that the chip is going to wear that breaker out and basically create a small crater behind the cutting edge. Well, now if I reduce my depth of cut to 20,000 ...
JACOB SANCHEZ: This looks familiar.
BRIAN JEWELL: ...which would be appropriate for a light breaker, I don't get a chip, I get a nest. And that's because I'm not engaging that cutting edge enough and making a thick enough chip to use that breaker to actually break the chip.
JACOB SANCHEZ: Do you got anything to show me? Can we see some cutting? What do we have on that end?
BRIAN JEWELL: We do. We got some 4140 in here that we're going to run multiple passes on. We'll show you what those chips are going to look like with each one of those breakers.
JACOB SANCHEZ: I'm always talking about it. We're about to see it. You're going to see some chips cut. What are you throwing at me?
BRIAN JEWELL: First pass, we're going to look at 70,000 depth of cut with a light breaker. This should be something that we're using as we get closer to finishing. We're going to see that it's able to make a chip. There's going to be a lot of heat in those chips and heat’s what kills our inserts right? So if you continue to run a light breaker all the time, you're probably not going to get the tool life that you'd like.
JACOB SANCHEZ: And we're doing this dry just for the purpose of the video, so we can see the chips. We can see the heat getting transferred to the chip, see what's happening. At the end of the day, you can throw coolant on at any time. It would change the color or change the temperature. Correct?
BRIAN JEWELL: Absolutely.
JACOB SANCHEZ: Let's do it. So already, we're seeing some sparks there which I've only ever seen type of melted with ceramic end mills. Which are pretty trippy. They make ceramic inserts for face mills too. I can see those. They're really small. They look like there's little grains of sand getting thrown at the back.
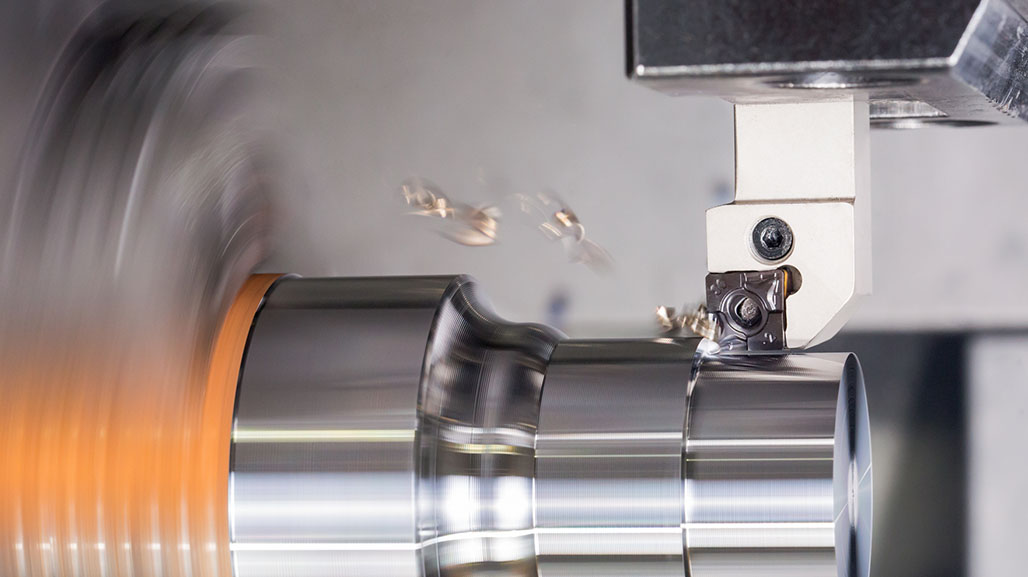
BRIAN JEWELL: Yeah, they're being broken very short because that breaker is close to the corner of that cutting edge. All right, next one is going to be the RP at 70,000 depth of cut, so this is something that we would use for roughing.
JACOB SANCHEZ: Yeah. Okay. Oh you can hear it a little more. You can hear them, they have some weight to them hitting the back.
BRIAN JEWELL: You can hear them inside the machine. It's a little bit of a larger chip. The curl of that chip is going to be a lot more open than what you had with the LP breaker. Now the next one will be our RP breaker. We're going to be running at 20,000 depth of cut. So usually we wouldn't use a roughing breaker to try to finish with.
We just want to show how that depth of cut affects generally on the minus side of things. As you get into lighter cuts, your breaker needs to be closer to the corner. And so these are going to be real fine. They should be pretty stringy. And you'll notice that that's the kind of chip that we get.
JACOB SANCHEZ: Almost instantly. So you can tell it's interesting seeing the sparks have a different sound to it. There's a different shape. Like just to those sparks coming up in general. And yeah you can see them.
BRIAN JEWELL: The next one will be the LP breaker. This is our light one again. And we're going to run it at the same depth. The cut that we just ran the RP at. And you'll see that because our breaker is closer to the cutting edge, it's going to make a manageable chip again.
JACOB SANCHEZ: Excellent. Yeah. Again you see little wire sparks. There are softer sounds. You can hear them quietly kind of hitting. You can tell these ones aren't the same shape either. Even if I wasn't looking right now, just hearing these different sounds, you can tell this one's going to be a different shape.
BRIAN JEWELL: So then the last pass will be just showing you that LP breaker where we should be using a finished breaker. So we're going to reduce that depth of cut again, to about eight thou. And so now we're not going to, you know, we're going to engage the cutting edge, but we're not making a thick enough chip to have the breaker actually break it.
You see how slow it is too.
JACOB SANCHEZ: Super quiet. Not even a sound. No sparks at all. And it's still, I think, still one strand, that's actually crazy.
BRIAN JEWELL: Running it like you would a finish pass, right?
BRIAN JEWELL: Now I got this stringy chip I can't get rid of or it wraps around and ruins that finish.
JACOB SANCHEZ: I love that man. I think I have a few other things to check out on another machine in your guy's facility. But I'll say something. Never did I think mill and lathe machinists would agree on something. We all love to examine our chips.
DAVID CASEY: Jacob.
JACOB SANCHEZ: David, good to see you again. I'm back in mill land, baby. I was just over with some lathes.
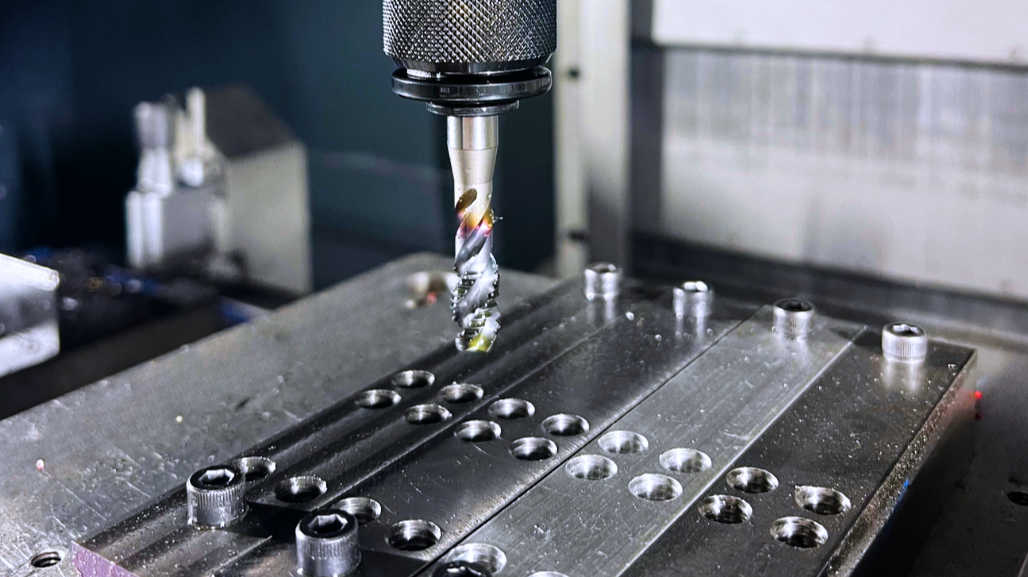
DAVID CASEY: So here we have a slotting demo that we use for one of our training classes. So we're looking at a 3-flute end mill that's designed for slotting at up to two times D. And then we're looking at a 4-flute end mill where we're also slotting, but we have to kind of cut back on your axial depth of cut.
And then also the third approach we look at is like a high-feed style end mill. And it's got a nice flat gash on the face of the tool.
So now that we've got Z zero, we can come in. We know where everything is. And this is our 3-flute end mill. And again, it's only a 3-flute end mill so it's giving you enough space to get the chips out at that higher depth of cut.
JACOB SANCHEZ: Barely even squeak on that turn. That usually means that those chips are evacuating pretty well out of there yeah?
DAVID CASEY: Yeah. So this next one. So the same tool but we're at 2 times D depth of cut instead of one times D. We're a little slower here. We're at 16 inches a minute instead of 55. Drop the spindle a little bit from 8K to 53.
JACOB SANCHEZ: All right. So now we're dropping to a 4-flute.
DAVID CASEY: Yeah. So this will be a VQMHVRB, so a 4-flute corner radius end mill. And we're running it, 8000 RPM, 32 inches a minute. But we're only at one times D.
JACOB SANCHEZ: It's even quieter. Nice. Then after this final pass, what do we have going on? We're going to flip it over?
DAVID CASEY: Yeah. So after this one, we'll look at a high-feed style with a ZFHVRB end mill. So, it's a corner radius end mill that's got a reduced neck. So you can reach a little bit further. But on the face of the tool, you've got a flat, plain gash. So that strengthens up that corner so we can run lower depth of cut but a much higher feed rate.
JACOB SANCHEZ: Nice.
DAVID CASEY: So our first tool is going to be a six millimeter VQMHBV. And we're, we're doing a ten millimeter wide swath. So we've got some extra room in there where we can get a dynamic toolpath in there, open that slot up relative to your tool diameter, and then you've got somewhere for your chips to go.
JACOB SANCHEZ: So now we're doing that closed pocket.
DAVID CASEY: Yep. So we're ramping into depth, helical ramp into depth. And then it'll start working out.
JACOB SANCHEZ: And this is usually the biggest issue you'll have is on this first entry, correct? When it comes to your chips. If they're not exiting that spiral, once you hit the floor and you start trochoidaling, that's where you'll get your breakage.
DAVID CASEY: Likely. Yeah, your first couple of passes already have the least amount of room for the chip.
JACOB SANCHEZ: I hear spindles turning and I smell some coolant. How's it going, brother?
LUCAS ENERSON: Good. How are you?
JACOB SANCHEZ: Good. You're the final demo of the day. What are you showing us right now? What are we going to be going over here at the DMU?
LUCAS ENERSON: Right now we're showing some two millimeter drilling. We've got a short little pilot drill just finishing up, but next we're going to come in with a 25 times D.
JACOB SANCHEZ: Oh, yeah.
LUCAS ENERSON: Two millimeter drill. Drilling is more of a continuous operation. So you have the chance to create one long chip or many long chips that could wrap around your tool and just destroy your operation you know?
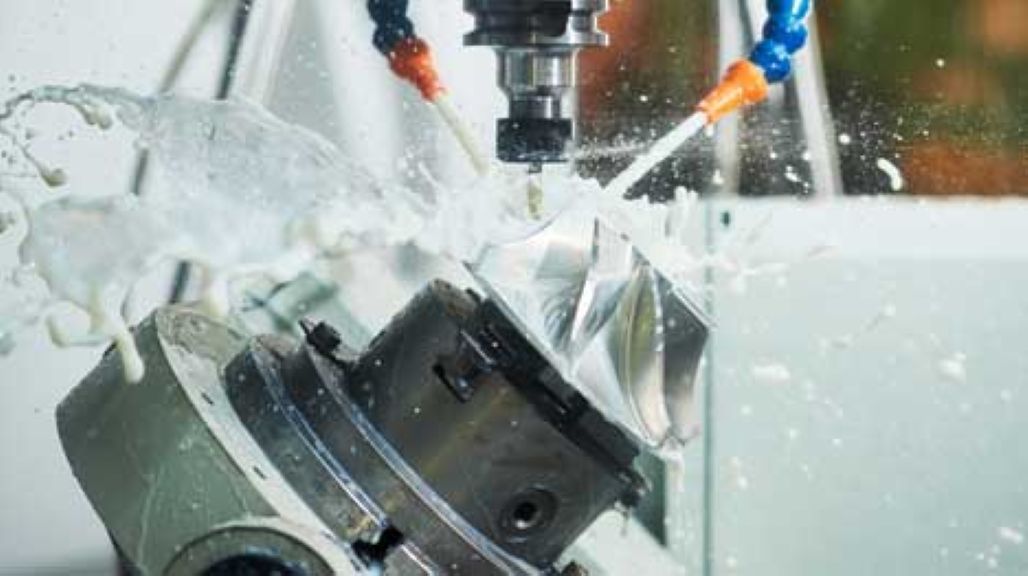
JACOB SANCHEZ: I think something that we haven't seen on any of the other machines, we haven't even talked about today, when it comes to managing your chips, is that through-spindle coolant right there. That through-spindle coolant can be a lifesaver on your machine with your features with whatever you're attacking on your part. It can really change the game. What are your thoughts on that?
LUCAS ENERSON: It's essential. I'd say you can't drill without it especially we're talking 25 times D.
JACOB SANCHEZ: So if you had to give one final piece of advice, one final thought on what you can do better to manage chips when it comes to drilling, what can you do?
LUCAS ENERSON: Drills need to be pushed harder than you think.
JACOB SANCHEZ: Interesting.
LUCAS ENERSON: Like when we're making a bird's nest like that, and we have long chips wrapping around our tool, we're not pushing it hard enough to let that drill, the drill geometry, create the short chip. .So we need to push it harder and let that drill snap those chips off and break them into smaller pieces.
JACOB SANCHEZ: I think that's going to be something I'm about to go do. My outro, summarize the day. That seems to be the theme that I'm here in between machines. We were talking about it over at the lathe, too. If you're not engaging past that landing enough, you're not even forming. You're not even getting a chance to form the chip.
You're almost just chattering, just vibrating, rubbing up against your part. You're not even taking a deep enough cut.
LUCAS ENERSON: Correct.
JACOB SANCHEZ: So it's very interesting you mentioned that, brother. Lucas, I appreciate your time on this demo. It's a beautiful part. It looks like it's going to keep getting even better. And I appreciate your time. I'm gonna go sum this day up. Okay? Thanks, man.
LUCAS ENERSON: Take care.
JACOB SANCHEZ: All right. See you guys. Thank you. Whew, that was a day. We really added some chapters to my machining story, and I hope yours as well.
Well, what did we really get into? Well, we started over in lathe-land. We had the LP, the MP, and the RP all running the same depth of cut, but different geometries, different shapes. It was the way that the chips were breaking off, coming off. And then from there we made these little adjustments, some for the worst and some for the best.
And then we moved over into my home, into Mill Land. We finally got over to some end mills, and there it's really not so much talking about how we're going to manage our chips. I know this episode, we wanted to talk about the safety, the management. We did that all day long. But the further we got along, it was more about the efficiency.
And I think that's what we saw with the end mills. We started to understand different slotting techniques. When you're making turns, where your chips can go and where they can't go. And then we ended on a beautiful machine, the DMU 65 five-axis machine. We were doing drilling, flat-bottom drilling. We were throwing in some end mills in there for some finishing. There was some facing, everything under the sun wrapped up in one.
And finally, there is where we got to the root of the episode. Across all these machines, across all these critical components of figuring out how we can manage our chips, I think we realized something. At the end of the day you need to push your tools for what they were meant to do.
You need to push your tools and run them how they were made to be ran. I think that's what we did here today, and we did it well with the Mitsubishi team.
So, you and I, now we both know how to safely manage our chips.
Narrator: For more metalworking tips and industry best practices, stay tuned for the next How To episode and subscribe to the MSC Industrial Supply YouTube channel, a source of original manufacturing content Built To Make You Better.